
As of 2026, I still judge a Throne and Liberty build by one question: can it adapt when the group needs something different? My favorite answer is the Greatsword plus Wand and Tome. It is not the flashiest combination on paper, and it does not hold your hand like a Sword and Shield setup, but it gives me health, regeneration, burst damage, curses, sustained healing, and emergency buttons in one package. The first time I tried it, I kept asking myself whether a Greatsword tank could really keep a group alive while also hitting hard enough to matter. After enough runs, the answer felt obvious: yes, as long as I respect the three pillars that hold the whole thing together.

The Three Pillars I Never Skip
This build works because three ideas reinforce each other:
-
⚔️ The Greatsword gives me serious health boosts, health regeneration, and outrageous damage.
-
✨ The Wand and Tome add a hybrid of healing and damage.
-
🩸 Curse and Vampiric Contract turn my damage into sustain for myself or my allies.
If I ignore one of those pillars, the build starts to wobble. A Greatsword without the Wand and Tome is just a heavy weapon. A Wand and Tome without the Greatsword lacks the front-line pressure and durability I want from a tank. And without Curse plus Vampiric Contract, I lose the strange self-sustaining engine that makes this combination feel so flexible. Can a tank really curse enemies, heal allies, and swing a giant sword without a Sword and Shield? In my experience, yes, but only when all three pieces are active at once.
Strength Comes First

Strength is my number one stat priority. It increases my health and improves my weapon damage, and both of those matter for this build. More health means more survivability, more room for mistakes, and a stronger foundation for passive effects that scale with maximum health. More weapon damage means my Greatsword strikes and my Curse-based damage actually threaten enemies instead of merely annoying them.
After Strength, I let the content decide the rest. If I am the main tank, I lean into durability and skill uptime. If I am flexing into a more supportive role, I favor healing and cooldown comfort. The beauty of this build is that I can walk back most decisions without fear, so experimenting never feels like a trap.
Why Curse and Vampiric Contract Matter
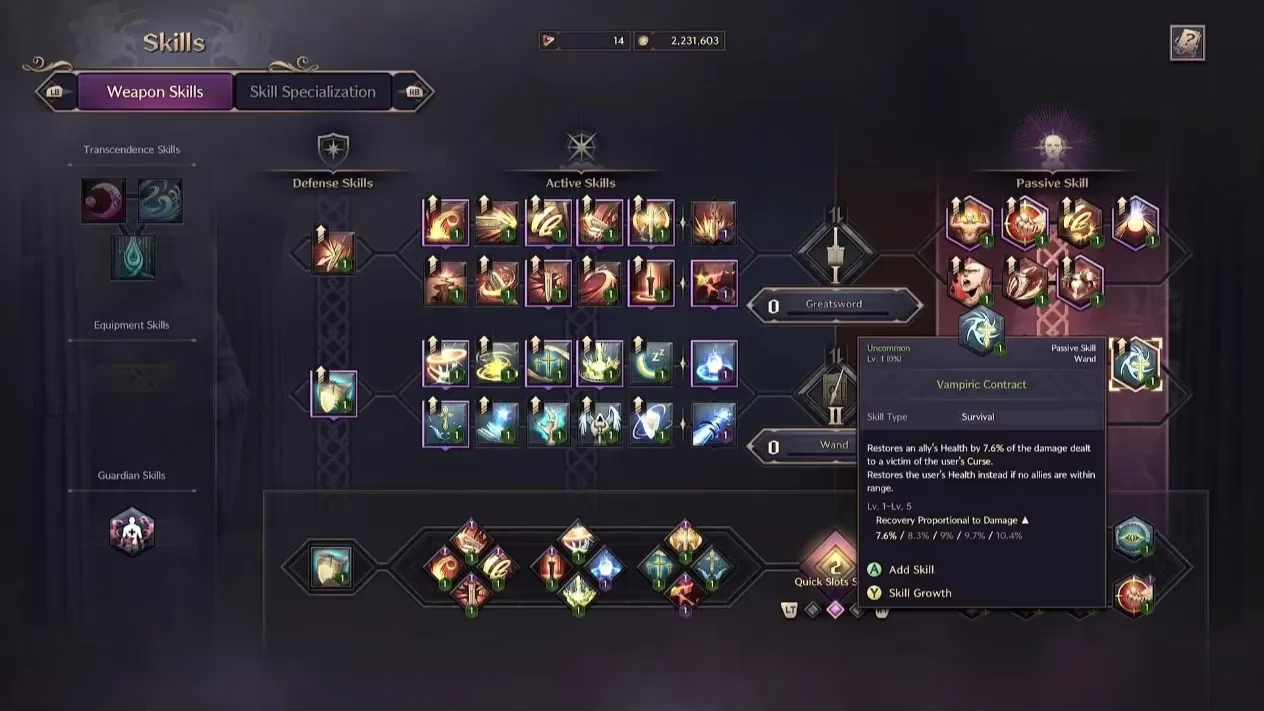
Vampiric Contract is the passive that makes this build feel almost unfair in the right situation. When I Curse an enemy, damage dealt to that target heals allies in a group. When I am solo, it heals me instead. That one mechanic lets me solo more or less any content I want, while also fitting easily into group play.
I do not treat Curse as optional flavor. It is the switch that turns my damage into recovery. Touch of Despair is my basic way to apply it, and Corrupted Magic Circle spreads it over an area. Wraith's Beckon makes the Curse more consistent by increasing its duration and the chance of application. When those pieces line up, I can hold a fight together while still contributing meaningful damage. Is that not exactly what a hybrid tank should do?
Skills and Specializations I Use
These are the active skills I keep on my bar. I tinker with them depending on the group, but this setup gives me a healthy balance of threat, control, healing, and curse uptime.
| Skill | Why I slot it |
|---|---|
| Touch of Despair | Inflicts Curse, which is fundamental. Radius Increased also Curses two other targets within three meters. |
| Valiant Brawl | Three hits of solid damage. Aggro Increased makes it a reliable threat tool. |
| Death Blow | Extreme damage, with extra damage against Bound, Sleeping, Shocked, or Stunned enemies. |
| Stunning Blow | Good damage and a chance to Stun. Aggro Increased and Effect Duration Increase make it better for tanking. |
| Willbreaker | Damages enemies around me and Weakens their defenses. Aggro Increased creates a group aggro draw. |
| Devastating Smash | A leap slam that deals radius damage and can Stun. |
| Fountain of Life | A ground heal for me and my allies. Mana Recovery, Radius Increased, and Effect Duration ▲ all help. |
| Corrupted Magic Circle | Creates a Cursed area with a stacking damage-over-time effect. Rotten Swamp extends it and Curses enemies who enter. |
| Swift Healing | My fastest emergency heal. Healing Transfers and Consecutive Use improve self-healing and repeat use. |
| Clay's Salvation | A slower heal that restores a considerable amount of my health and nearby allies' health. Radius Increased helps reach them. |
| Blood Devotion | Tethers me to an ally and transfers 40% of their incoming damage to me. I like this on a melee damage dealer who gets into trouble. |
| DaVinci's Courage | Increases max health, health regeneration, and attack speed for me and nearby allies. Damage Reduction, Duration Increased, and Instant Healing make it a staple. |
The passives are just as important:
| Passive | What it does for me |
|---|---|
| Vampiric Contract | Heals me solo or allies in a group for damage dealt to a Cursed enemy. Non-negotiable. |
| Wraith's Beckon | Increases Curse duration and Curse chance, making the build more consistent. |
| Noble Revival | Boosts skill healing by a percentage of max Mana. Small, but it adds up. |
| Devotion and Emptiness | Improves healing and cooldowns during the day, and DoT and Curse cooldowns at night. |
| Vital Force | Increases hit chance, skill damage boost, and Stun chance for every 100 max health. With this build, that bonus is substantial. |
| Indomitable Armor | Gives me a chance to increase defense when I take damage, stacking three times. I get hit constantly, so this matters. |
| Victor's Morale | Skill damage heals me a small amount and restores some Mana. Extra sustain is extra sustain. |
| Robust Constitution | Increases max health and health regeneration considerably. There is no reason not to run it. |
Weapon Mastery Paths

Weapon Mastery only applies to the weapon currently in hand, which is why both trees still matter here. When I auto-attack with my Greatsword, my Wand and Tome mastery effects are dormant. When I cast a Wand and Tome skill, that weapon is active and its mastery effects apply. The Greatsword tree may be active more than half the time, but the Wand and Tome tree is never irrelevant.
For the Greatsword, I usually favor the Charge tree because it gives defense, evasion, max health, and cooldown speed. Those are exactly the things that keep a hybrid tank alive. If I want more damage, Incapacitate and Face Off are both viable directions.
For the Wand and Tome, Recovery is my default because it adds defense, evasion, and skill heal. The Weaken branch is excellent when I want even longer Curse duration and stronger debuffing. The Damage branch does what it says and lets me push extra damage when the group does not need more healing.
How I Play It
Many players assume Sword and Shield is mandatory for tanking because it has the easiest Provoke path. I understand that logic, but Greatsword can draw aggro too, just with a little more effort and the right specializations. My usual loop is simple: open with Touch of Despair or Corrupted Magic Circle to establish Curse, keep DaVinci's Courage active as often as possible, drop Fountain of Life where the group is fighting, and use Willbreaker plus Valiant Brawl and Stunning Blow to hold threat. Death Blow comes after a Stun or Devastating Smash. Swift Healing and Clay's Salvation cover emergencies, while Blood Devotion protects a melee ally who is taking too much heat.
The loop is busy, but that is why I like it. I am not just a damage sponge. I am a curse engine, a healer, and a threat anchor. In 2026, I still treat this Greatsword and Wand and Tome setup as a flexible template rather than a frozen meta list. Push it toward tanking, healing, or damage, and it rewards the experiment. If you want a build that can solo, fit into groups, and keep you thinking, this is the one I keep coming back to.
Comments