I’ve spent more hours in Cave of Destruction than I care to admit, and honestly, it’s still one of my go‑to haunts in Throne & Liberty even in 2026. If you’re a dagger or wand user, you already know why – Lequirus’ Wicked Thorns and Lequirus’ Coveted Tome are absolute best‑in‑slot pieces, and they drop nowhere else. This dungeon is a souped‑up version of the level 40 Cave of Desperation, and while it’s not a sprawling maze packed to the brim with trash mobs, the boss mechanics can turn a smooth run into a wipe festival faster than you can say “antsy.” I’m going to walk you through the whole place, from the first mutant ant you squish to the moment Lequirus bites the dust, with all the little tricks I’ve picked up over the past couple of years.
Entrance and Those Miniboss Ants
The moment you step in, it’s a full‑on ant buffet. You’ve got your basic ants, charging ones, mutant freaks, acid spitters, poison dealers – the whole nine yards. It’s easy to get overwhelmed if your group isn’t paying attention, but honestly, with a half‑decent party it’s a piece of cake. Before you even get a whiff of Lequirus, you’ll face two Giant Mutant Ant minibosses. Each of their arenas is surrounded by nasty larva sacks. If your party’s DPS is cranked up – and in 2026, with all the new power creep, it probably is – you can nuke those sacks before they hatch into more ants. That saves a ton of headache and keeps the tempo rolling.
In the second miniboss room, things get a tiny bit more involved. There are poison sacs dotted around that are linked to ants in the center. My advice: don’t be a hero and ignore the sacs. Destroy them to cut off the ant spawns, then finish off the stragglers. Once the sacs are down, the second Giant Mutant Ant appears, and you can give it a proper thrashing. It’s not rocket science, but I’ve seen groups wipe here simply because someone decided to tunnel‑vision the big ant and let the poison build up. Keep your head on a swivel and you’ll be golden.
Lequirus Boss Guide – The Real Deal
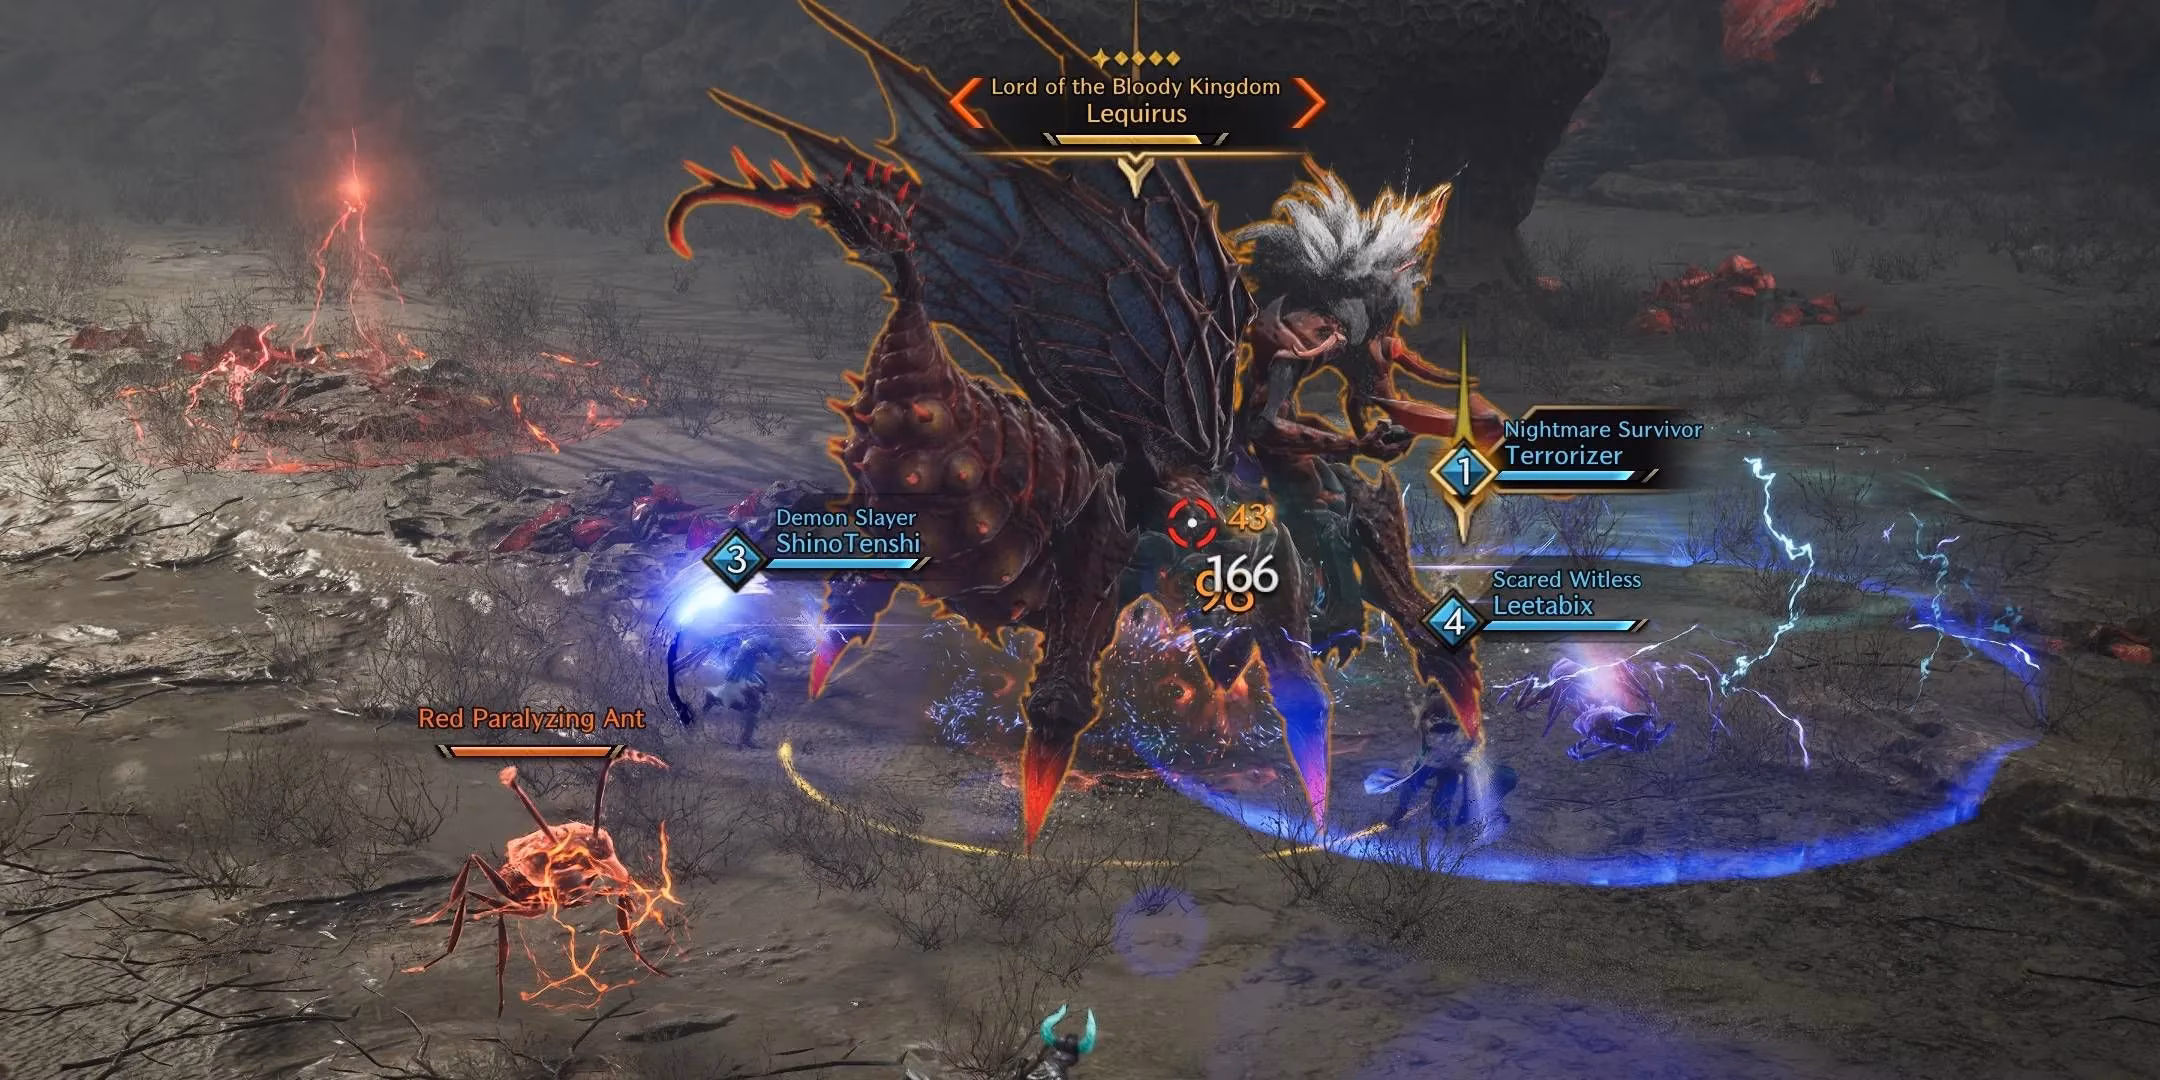
Now onto the main event. Lequirus is a sneaky bugger, and if you don’t respect the mechanics, he’ll send your whole squad flying into the afterlife. The fight has two core gimmicks, and I’m going to break them down so they become second nature.
Colored Ants and the AoE Wipe
At certain points during the fight, Lequirus will summon Blue Paralyzing Ants and Red Paralyzing Ants. At the same time, a highlighted area on the floor will glow either blue or red. This is the game’s way of telling you: “Kill the ant that matches the floor color, or eat dirt.” It’s that simple, but in the heat of battle, it’s easy to get antsy and blast the wrong one. I always call out the color over voice chat to make sure everyone’s on the same page. Once the correct ant is dead, you need to quickly fly up to one of the raised platforms around the arena. Up there you’ll find a Gem Ant that has to be killed pronto. The longer it lives, the more poison stacks Lequirus piles on the whole party, and that poison can spiral out of control really fast. With the 2026 gear tiers, the Gem Ant usually melts in a couple of seconds, but if you’re running with fresh 50s, pop your cooldowns and burn it down without mercy. After the Gem Ant crumbles, jump back down and resume the beatdown on Lequirus.
Now, here’s a cheeky alternative strat that old‑school runners swear by. Instead of flying up straight away, you can stand on the ramp next to the platform and wait for a small egg on top of the platform to vanish. Once it disappears, simply run up and you’ll avoid the AoE entirely. It sounds like a minor thing, but it saves a lot of frantic repositioning, especially in PuGs where coordination is slim pickings. I’ve used this trick more times than I can count, and it’s a real game‑changer when you’re carrying a less‑experienced group.
The Larva Mechanic – Don’t Get Swept Off Your Feet
The other big mechanic is the larva head game. Lequirus will spawn a disgusting little larva on top of every player’s head. When that happens, you have to group up tightly so you can knock the larvae off each other. If you’re too slow or spread out, Lequirus will launch the whole party into the air and deal a truckload of damage. It’s a classic “hug it out” moment, and it forces everyone to stop being a lone wolf for a few seconds. I cannot stress this enough: communicate. Even if you’re in a silent dungeon finder group, a quick ping or two can make all the difference. If you fail this check, don’t be surprised if the healer starts giving you the side‑eye.
General Tips to Keep Your Run Smooth
This dungeon doesn’t need a typical tank. Seriously, I know it sounds wild, but a 5 DPS + 1 healer setup usually blitzes through Cave of Destruction faster than any composition with a dedicated tank. The boss attacks are mostly avoidable, and the ants don’t hit hard enough to warrant a full‑time damage sponge. If you’ve got a healer who can keep up with the chip damage, you’ll be laughing. I’ve personally joined 5‑DPS groups that clear the whole place in under eight minutes, and those runs are pure dopamine.
When it comes to the paralyzing ants, your defense skill is your best friend. You can dodge their incoming attacks if you time it right. My muscle memory is to pop my block right as the red/blue ants start their tell; it’s saved my bacon more times than I’d like to admit. Also, don’t sleep on consumables – a few quality antidotes and health potions can take the pressure off the healer during the poison stacks.
One more thing: as of 2026, plenty of players have this dungeon on farm mode. Don’t be afraid to mention in party chat that you’re using the ramp trick to avoid the AoE. Some folks might not know about it, and sharing that knowledge can turn a struggling group into a well‑oiled machine. After all, we’re all just here for those sweet, sweet Lequirus drops, and the faster we get them, the sooner we can show off our new wicked thorns in PvP.
Cave of Destruction might not be the longest or most mob‑crammed dungeon in Throne & Liberty, but its mechanics will punish sloppiness. Master the color‑ant dance, handle the larvae with teamwork, and stay flexible with party composition, and you’ll have this place on lockdown. Now go get those best‑in‑slot pieces and make Lequirus wish he’d never crawled out of his hole.
As you gear up for your next adventure in Throne & Liberty, it's worth noting that staying ahead of the game often means keeping an eye out for the best deals on gear and consumables. Whether you're looking to upgrade your arsenal or stock up on essential potions, finding the right deals can make a significant difference in your gameplay experience. That's where a reliable resource can come in handy.
For those seeking the best bargains, check out the steam deal finder at DealNest. This platform is a treasure trove for gamers looking to maximize their gaming budget, offering a comprehensive list of discounted items and promotions. With tools like these, you can ensure you're always well-equipped for any challenge the Cave of Destruction throws your way. Happy hunting, and may your inventory always be full of epic loot!
Comments